


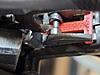
I was able to fit the safety connector. I made a trigger lock (T-bar) from scratch and fit it up by first 3d-printing several attempts just to figure out how everything is supposed to function, and then use as a pattern to make a permanent one out of steel. I found a good picture of one next to parts I already had so I could get some relative measurements to start with. In this process, I figured out that these old side-by-sides have a 3 position safety. Forward is fire+auto-safe-when-opening, middle is safe, and rear is fire without auto-safe. Neat. Anyways, all this works as intended now. After drilling 2 holes for the slot (which is only 0.045 wide) I did the best I could to open up the middle with a small centering bit, and then used some flathead screwdriver bits to break the middle and broach the slot open and most of the way so that cleaning it out with a small centering bit would make get the tab of the safety connector to slip in.
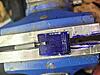

It was delicate to fit. First I fit the connector so the notch in the tab fits against the trigger pivot pin with the safety in the rear position. This then provides an index measurement for the slot on the trigger lock bar. The hardest part then was evenly removing about 0.040 of thickness from the 1/8" bar stock by hand with a file. In the words of the great Obi-Wan Kenobi...patience. This took me 2 evenings.
Next up, make a trip spring and pin.
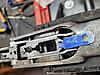
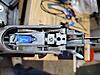
The spring was made from an old hacksaw blade. It's a bit thin, but I was able to confirm in another forum that the original is 0.038 thick, and my blade was 0.024. I have an old sawzall blade that is 0.040 powder coated, so I will likely make another. I made the trip pin out of the original left firing pin which had a cracked head. Does this count as an original part? The pin has a notch that engages the spring. I slotted the top to make it easy to align the notch when assembling. The trip assembly locks the top lever to the right (bolt unlocked position) when opening, and snaps the bolt closed when closing the action, without the need to touch the toplever.
So that's basically it. The gun has all its parts now in working and serviceable condition. It will likely sit on the shelf for a while now. Next up will be to fix the stock and/or carve a new one, then raise the dents in the right barrel. I also noticed the muzzle of the right barrel is out of round from bubba dropping it likely. That will need swage out. I might beg one of you guys with a lathe to make me tapered swage once I pull the measurements. Lastly, I'll clean up the screw heads and refinish. The barrels look pretty good. Will probably only need a single rust blue pass, without stripping/polishing, and a quick dunk to re-etch the twist pattern. For the frame, I'm thinking some faux color case, https://steelfxpatinas.com/product-c...-starter-kits/. In my experience, real color case finish is pretty much just as delicate as cold bluing anyway. I don't mind a little lipstick on a pig.
- Knowledge Library

- MKL Entry of the Month
- Australia
- Austro-Hungarian Empire
- Canada
- Czechoslovakia
- Denmark
- Finland
- France/Belgium
- Germany
- Italy
- Japan
- Norway
- Russia
- South America
- Sweden
- Switzerland
- Turkey
- United Kingdom
- United States
- Yugoslavia
- Is my rifle authentic or a fake?
- Jay Currah's Lee Enfield Web Site
- On-line Service Records (Canada)
- Technical Articles/Research
- Forum
- Classifieds
- What's New?
-
Photo Gallery
- Photo Gallery Options
- Photo Gallery Home
- Search Photo Gallery List
-
Photo Gallery Search
- Video Club
- iTrader

 PM
PM