-
I bought 2 of these 3 years ago when AIM first offered them.
I stripped the slopped-on cheap black paint from both metal & wood. I left the metal as-is and refurbed the wood with BLO .
.
Before & After:
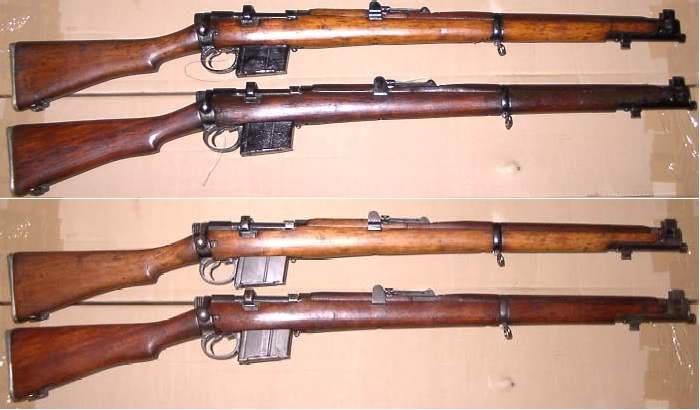
-
-
08-09-2009 03:33 PM
# ADS
Friends and Sponsors

-
FREE MEMBER
NO Posting or PM's Allowed

Having restored a few of the NATO 2A1 have found a certain consistency to what many think is the paint madness.
Think it through... the guys were often posted to a local post out the back of nubat nowhere and with time on their hands the boss would say, 'you, you and you go out and clean up those rifles... heres the paint, go to it'. This is reflected in the hand application across the metal with splashes seen around the middle band on the wood, rear sights fully gummed up by paint etc. This overly applied 'protection' is why today many of these old bangers clean up so well. Yet the rack number was applied with some care and is a feature of this model as is the cross screw that helps to prevent / hold together forearm splits. The draws are also a lesson in recycling, where in one rifle the recoil blocks had been replaced no fewer than four (4) that's right 4 times !! with the last FTR (f*&%king terrible repair) had the grain running across the line of force, which meant they went to mush very quickly. This one has had a new fore-end fitted and now shoots like a dream and am tinkering with the idea of having a few heavy barrels cut to see just how good this model can perform, or not. The 'H' barrel is permitted for No. 1 shoots so why not for the 2A / 2A1 model?
Summer is the best time to do this work. Cleaning is a generous application of a gel paint stripper (in a well aired place, with gloves on), a good wash down, do the same again and again until clean. Once back to the unpainted finish a close inspection for damage and then into the electrobath to rid the beasty of any developing rust. On removal and drying an application of a heavy oil to the outside and bore and again allow to dry in the sun or under a heat lamp. This is to encourage the oil to seep well into the parkerising as well as to help dislodge the mud often found in the nooks and cranny of the metal work. Using a satay skewer / stick (like a big tooth pick) pick out the mud and dispose of very carefully as it will most likely contain pollen, pathogens and seed - put it in the 'to burn' bucket.
Once the oil has soaked in, it is then possible to go over it from a mechanical perspective looking for problems, fitting of bolt, magazine etc. Have found that the magazine is individual to each rifle and often will need a few tweaks to the ears to guarantee good feeding, especially if magazine feed max. length reloads are used. The throat is generous as is the chamber, which means flat base projectiles are the go for single feeding / match shooting if you are of the school that has the pill just sitting off the lands - these rounds will not feed from the mag. Best to push only the head end of the case into the rear top of the mag so as to ensure the round slides up the bolt face on loading. This helps to keep unnecessary stress off the ejector claw.
Now all is looking well, rounds loading properly, and a good oily feel - prep the metal for the new paint job by a generous application of degreaser - all oil must be removed and the surface dry and warm - then mask off the areas no paint should be on, ie, bolt slide, muzzle, breach, butt etc. Stove pipe or engine exhaust aerosol in a flat or semigloss is the go, but only after striping all the parts that can come off. The small parts can be stood up on the lid of the spray can after punching small holes that the thread can screw into. This allows for painting from all sides. Light consistent coats rather than full blast. It will take four or five passes to build up the new coating. Allow to dry between coats at least four to six hours.
You may not need to remove the butt, as the bolt head is often buggered and the butt is a very handy extension to the rest as it can be gripped while other work goes on with the metal. The woods will need some attention as well, as often the rear of the forearm is gooped up with oils from standing the rifle up on its butt (so to speak) and the oils migrate down into the wood around the draws. Thus it is a good thing to store smellys muzzle down, resting on the bayonet stud on a piece of card or cloth in the safe, this allows bore to drain away from the draws.
Reassemble, check headspace, tighten all, check barrel alignment before putting the nosecap back on and if it is not perfect dead center (before and after nosecap goes on and middle barrel band screwed down), then work is required at the other end of the wood to remedy this malaise. Plenty of experts out there will tell you how.
Will post a few pickies once i can find them on this 'puter.
Lots of luck.
-


 PM
PM


