-
Legacy Member

-
-
01-06-2024 05:06 PM
# ADS
Friends and Sponsors

-
Legacy Member
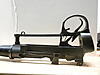
Some more investigating.
I removed the fore-end and just attached the trigger guard with the collar and screw and the rear hole perfectly aligned with the hole in the body. So I'm figuring that the trigger guard is at least flat enough.
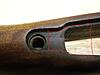
When I set the guard into the recess in the fore-end it fits pretty well except there seems to be a high spot just behind the front trigger guard screw. The guard pivots slightly at the highlited area in the second picture. It's hard to see in the photo but the wood has a smooth and shiny appearance where there is contact at the pivot point. When it's just placed in the recess without the front screw tightened it lines up correctly at the rear.
Another question. I'm considering 2 options at this point. The first is to use a few thousandths of shims between the collar and the trigger guard to prevent the rocking and get the correct alignment with the rear screw in the trigger guard. This would also prevent the lifting of the muzzle at the front of the fore-end. The other is to carefully scrape the high spot of the fore-end until it no longer rocks and aligns properly. I shouldn't have to adjust the length of the collar as it's not contacting the trigger guard boss until it's tightened a bit and begins to pivot.
What do you think?
Stuart
-
-
-
Advisory Panel

It is an arcane and mysterious art grasshopper. You must take a piece of wood and make it fit securely on six surfaces the metal parts within it. The metal must bear against the wood equally and evenly. But you shout, "metal hardly moves at all while wood wanders like a stray cat!" This is so Grasshopper, and the ancients designed it thus that you might learn patience, or to prefer plastic rifles according to your inclinations.
“There are invisible rulers who control the destinies of millions. It is not generally realized to what extent the words and actions of our most influential public men are dictated by shrewd persons operating behind the scenes.”
Edward Bernays, 1928
Much changes, much remains the same.
-
The Following 3 Members Say Thank You to Surpmil For This Useful Post:
-
Contributing Member

I'd put the trigger guard front screw in but leave it loose then put the rear trigger guard screw in the tighten almost fully the front screw then the rear trigger guard screw tighten up to nip point, nip the front trigger guard screw up then the rear.
Thing is with wood once you start removing it ya canny put it back!
I've downloaded all of Peter L's articles and have Roger Wallams book on accurizing the Lee Enfield but I am not trained nor have the experience to go fiddling with the bedding.
-
-
Contributing Member
First thing I always ask is- does the bugger shoot? seen some absolute dogs, butchered, sporterised enfields, loose forends, no up pressure and they still group. Agree, once the wood has been removed, its difficult to put it back again.
-
-
Legacy Member
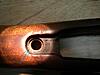
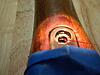
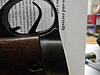
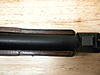
After further examination I have determined (rigthly or wrongly) that the recess for the trigger guard is actually flat from behind the hole for the boss all the way back. The problem lies where the front of the trigger guard rests at the very front. There is a very narrow ledge that is crushed down allowing the rear of the guard to rise up as the front screw is tightened. Picture 1. This with the fact that the collar appears to be too short by about 1/16". Picture 2.
So I know I'm going to get some pushback on this but instead of scraping the trigger guard recess I have decided to epoxy bed the forward portion. I could remove some of the wood and replace it and re machine it to fit but using a small amount of epoxy will give me a perfect fit withought a lot of fuss. Also it will keep the correct alignment I already have with the rear trigger guard screw. This will give the guard a place to rest the forward tip and help prevent it from tipping down. I'll also have to shim the collar to get the correct length. I know if I just shim the collar it will effectively keep the front of the guard from tipping down but I think it needs to be more secure to help prevent movement.
The adventure continues.
Stuart
-
-
Contributing Member
There are all sorts of weird and wonderful interactions happening in this area. Roger Wadham has a load of video's on YouTube under 'Enfield Accurizing' which describes really well. the wood in this area should only compress so far until the guard contacts the screw bushing. PL would be able to confirm, but originally the armorers had to size this with a gauge to ensure correct fitment. I picked up a BSA a few years ago that had been 'refurbed' by a guy locally. there was no bushing installed. Picked up a few surplus and they vary wildly in size as they are normally stoned down to fit. I got lucky and it made the world of difference.
Good luck and may the force be with you.
-
-
Advisory Panel
Why not replace the collar if it's too short? Someone putting great ape strength on the front guard screw with the shortened collar is why it's crushed. Shims are a no-go but I digress.
-
Thank You to Brian Dick For This Useful Post:
-
Legacy Member
Shims are a no-go but I digress.
Brian, thanks for chiming in.
I could get a new collar but the steel shims will at least get me going in the right direction. Once I get the trigger guard area figured out I still have to set the muzzle pressure which is currently little to non existant. And any trimming of the area under the barrel reinforce will likely result in changes to the collar length. Change one thing here then it seems that there are adjustments to be made everywhere else. There's also the left/right slop at the draws that might need to be addressed as well. Definitly a challenging and fun exercise.
Numrich has it for just over $3.
Or do you have any?
Stuart
Last edited by flygrimm; 01-09-2024 at 04:12 PM.
-
-
Advisory Panel
I've got plenty if/when you need one.
-
Thank You to Brian Dick For This Useful Post:


Thanks Brian!).

 PM
PM


