-
Contributing Member


My experience with Urushi touchups on T99 stock
All,
In response to requests in my thread regarding my Type 99 Long thread: https://www.milsurps.com/showthread.php?t=79995&page=1
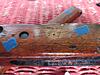
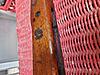
Several months ago I purchased a T99 long rifle that had several scratches, dings and 2 - 1" areas on either side of the receiver where a previous owner scratched "7.7" into the stock. I assume the same owner or later owner then tried to scratch the "7.7" out and in the process removed the urishi lacquer finish and removed the underlying wood layers. Each location is rough and in a slight depression in the wood felt by rubbing finger over the area.
There are several other locations on the stock that have been scratched, dinged, frayed over the years exposing the underlying wood.
I intended to touchup the stock, not a complete re-finish. The rifle being a type 99 long, the chances of easily replacing the stock is not likely. Since the stock was damaged, my intention was to apply urushi to specific spots to seal the exposed wood. This is to preserve the wood, protect it and maybe improve the look of the rifle. My intention was not to cover up the damage that is part of the rifle's story through time.
I purchased some raw Seshime Ki Urushi from Amazon. It came in a sealed metal tube with with the allergy warning stickers. I wont go into the Urushi allergy concerns since most folks here are all familiar with it, if you are not please google it. Proper curing of urushi requires warm temperatures and high humidity. That is exactly what we had in July 2024 in Georgia, USA . Three weeks of high humidity, rain and very warm temps - perfect time to do this.
I had a leftover hooded paper chemical suit laying around, a surgical mask and some gloves. I did the work in a screened porch exposed to the outside heat and humidity, with no direct contact with the rain. I used a small disposable brush, condiment cup, paper towels and some steel wool to work with the urushi.
Process:
1. Removed the metal parts of the rifle from the stock leaving just the wood pieces.
2. Examined the wood and used steel wool to smooth or exacto knife to remove stray wood fibers.
3. Marked the stock with masking tape all the places intended to apply the urushi.
4. Suited up.
5. Shook the tube of urushi, a liquid, to mix it. Opened the tube of urushi, and squeezed out some into the condiment cup. It was initially a light tan color.
6. Applied the urushi evenly to the areas with the brush.
7. Left the urushi on the stock for 15-20 minutes. The urushi quickly changes color to a reddish brown, then a dark chocolate and finally to a black.
8. After 15 minutes, I wiped off the urushi with a paper towel.
9. I then used the steel wool to knock down any high spots and applied another coat of urushi. Let sit 15 minutes, then wipe off, etc...
10. I applied 6 coats of urushi.
11. I left the stock in the high heat and humidity for 6 days to allow for complete curing.
Lessons learned.
1. In areas that cannot be sanded smooth, urushi will result in a very dark brown or black color.
2. Watch the urushi as it sits and wipe off before color goes too dark. When it gets to the desired tone wipe it off.
3. I had zero allergic reactions, but I covered up and was careful.
I am in general happy with the result. I achieved my goals of wood preservation without it looking like a cover-up job.
I would consider using this urushi to re-finish a complete stock if I ever acquired a sanded stock rifle.
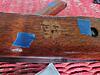
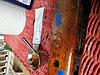
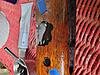
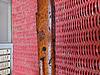
Pictures:
Before with places marked with tape:


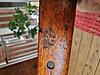
Application of Urushi:

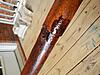
Results:
Last edited by baconslayer; 08-05-2024 at 01:24 PM.
Reason: add
-
The Following 6 Members Say Thank You to baconslayer For This Useful Post:
-
08-05-2024 12:26 PM
# ADS
Friends and Sponsors

-
Legacy Member
My experience with Urushi touchups on T99 stock
Thanks for the write up. I have a few rifles Bubba took to the sanding shed and would be interested in giving this a try one day.
One question, are you able to apply it like stain and rub urushi from thicker applied areas to thinner areas or does the urushi darken once applied and once too dark should be removed and not rubbed around to thinner applied areas? Does it darken once applied and exposed to warm/humid air and should be removed/tossed once it darkens?
-
-
Contributing Member
J-ROD,
Sorry for the delay. On the rifle, was doing small spots, so was treating more like a paint.
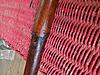
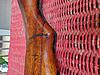
I did apply urushi with a brush to a oak dowel rod that was lying around. The urushi was painted on, left for 15 minutes then wiped off with a paper towel and left to cure. All the research suggested using a brush like applicator, leave on and wipe off. So I never attempted a stain style application.
Yes, the urushi starts to darken immediately when exposed to air and should be removed once desired color tone is achieved. Dont wander off, monitor color closely, it changes fast.
The oak dowel rod has continued to darken since application and initial curing. Initial curing it was a nice golden-brown has changed to more of a pleasing chocolate-brown.
-
Thank You to baconslayer For This Useful Post:


 PM
PM


