-
FREE MEMBER
NO Posting or PM's Allowed

No.4 Resto questions
Hey all,
I have started my first restoration and had a couple of questions.
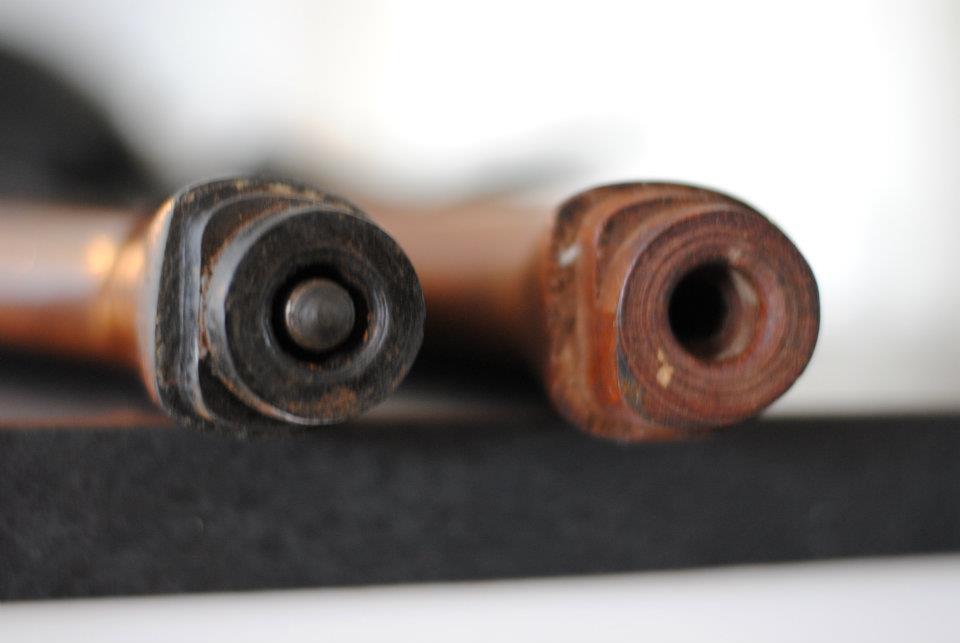
Firstly when looking at the new buttstock, it seems I have a square peg in a round hole situation. Is this a complete variance in wood or did someone at the factory get lazy? Should I just sand the new stock (On the right) to match the old ones dimensions?
second, what is the best way to remove the little retention pin on the rear sight axle with out marring the metal?
Thirdly, Head space. I got the rifle with no bolt and have aquired a new one and a full assotment of 0-3 bolt heads. Would I simply use a field gauge (.74) and find a bolt head that it would not close with?
Thanks for any answers!
Information
 |
Warning: This is a relatively older thread
This discussion is older than 360 days. Some information contained in it may no longer be current. |
|
-
06-03-2012 12:35 PM
# ADS
Friends and Sponsors

-
Is there actually anything physically wrong with the old original butt? I ask because it LOOKS to me like you've got a new No1 rifle butt there. While it'll fit, after a bit of simple carpentry, it ain't right
If you do decide to fit it, there's also a thread on this forum that details the fitting and the clearances that you must maintain
to remove the pin that retains the backsight axis pin, use a drift with a smaller diameter than the pin and you should be home and dry
Fitting a new bolt and CHS-ing your rifle afterwards.......... There is a detailed thread explaining how to do this PROPERLY. Look it up and read it. Then read it again. You'll find that you probably won't get a bolt head that'll close on a .74 gauge so I'd beg, borrow or steal the .064 and .074" gauges, fit the bolt to the rifle THEN CHS it
-
-
-
Legacy Member

1) if the stock fits use it how it is if its the correct stock for the rifle
2) use a small punch with a flat tip to get the pin out it comes out the top
3) head space is just a tollerence factor to cover the variences in rims by different ammo makers. the way I do it is to set the head space for the ammo I am using by finding a bolt head that will close firmly on the brand of brass I am using in that rifle. rims on S&B are thinner than rims on RG 44 so if you intend to reload its best to set it so its firm on the brass you use.
I would be checking the bolt for proper fit at the locking lugs before going on to head space it
The bolt needs to be in full contact on the bearing surfaces in the receiver if not disaster might be in your future
Last edited by ActionYobbo; 06-03-2012 at 01:51 PM.
-
-
FREE MEMBER
NO Posting or PM's Allowed
Thanks for all the great replies so far.
So I have a No.1 stock eh? I ordered one of those $40 sarco sets and that is what they sent with it. It prefer not to use the og stock because bubba got to it and refinished it.
-
I didn't say that youi DID have a No1 rifle butt, but it looked like it. The No 4 butts came with two butt socket profiles. Ihn your case, use your carpentry skills to round off the squared off part until the tapered part fits into the taper of the butt socket of the rifle. You should have the width of a hacksaw blade or so between the face of the butt and the butt socket to prevent the socket of the butt splitting under recoil early on in its life
-
-
Advisory Panel


Originally Posted by
D-BOMB

Left stock is British No4.
No4.
Right stock is probably Long Branch or Savage No4, though I have a post-war replacement No4 British manufactured stock with the same profile.
I suspect that the original drawings sent to Long Branch and Savage were for the No4 trials rifles and retained the extra "lobe" on the butt stock from the SMLE, the British with their backs against the wall by the time the factories were set up or changed over to No4 production probably just simplified the butt socket and stock to minimize machine time.
-
The Following 2 Members Say Thank You to Lee Enfield For This Useful Post:
-
FREE MEMBER
NO Posting or PM's Allowed
Well I think I may try an sand it down as Peter said.
I think I might have to sand the forstock a bit aswell
as it just doesn't want to seat all the way, is this normal?
Also how does one check to ensure the bearing surface on the locking lugs are solid?
-
Legacy Member


As far as patching the drawers, follow this link.
Tbone shows how you can do it. How to measure using bearing blue and how to repair - if you posess his level of craftsmanship.
No4 Mk1 T Rebuild
Paul
-
-
Before you start cutting/rasping it down DBomb........ Is it me? Or can anyone else see what looks to be the cut-out for the No1 rifle locking bolt at the top.just to the rear of the ledge of the 'new' butt?
If it is the No1 butt I mentioned DBomb, this interchange was permitted in the lilitary to make the best use of the spare parts available and avoid waste (we often got No1 butts from Ordnance instead of No4 types) but you might not appreciate it on your refurbed No4 is all I'm suggesting
British made rifles came with both internal butt socket profiles and butts came with both too. Both interchange and fit without much trouble and there was an EMER ref. explaining it all in detail
-
Thank You to Peter Laidler For This Useful Post:
-
FREE MEMBER
NO Posting or PM's Allowed
Well I went to work on it and got the profiles very similar, I am now going to start attempting to find the points on the forstock to sand a bit to get the action to drop in.


 Register To Reply


