-
The cradle cap screws should be staked but there is no engineering reason for it on a single shot bolt action rifle as by definition, they are taper lock! and as a rule of thumb, No4T's don't do a lot of machine gun-like fire.
Remember this Mad Crate. Those screws are like rocking horse manure. You COULD make some more but if th taper is wrong, they won't mechanically lock as they should. So, If it ain't broke, then don't fix it
-
-
01-17-2010 07:10 AM
# ADS
Friends and Sponsors

-
FREE MEMBER
NO Posting or PM's Allowed

The cradle cap screws should be staked but there is no engineering reason for it on a single shot bolt action rifle as by definition, they are taper lock! and as a rule of thumb, No4T's don't do a lot of machine gun-like fire.
Remember this Mad Crate. Those screws are like rocking horse manure. You COULD make some more but if th taper is wrong, they won't mechanically lock as they should. So, If it ain't broke, then don't fix it
I under stand about the horse pucky, I have found it necessary to clean my boots in the past.
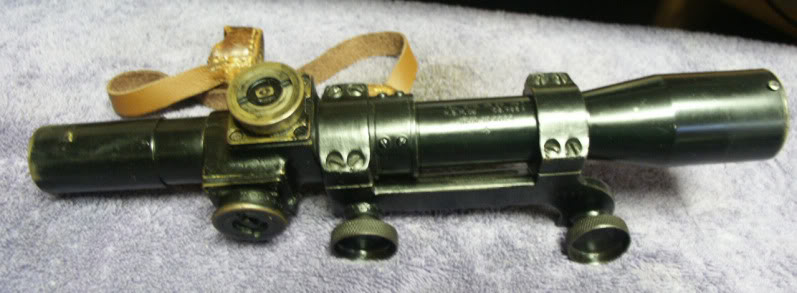
After cleaning the crud from the screw slots they came out very nicely. I immediately noticed the taper. Much different that my clone mount. I detail cleaned the exterior of the scope, the main body does appear the be blued steel under the paint. My main concern is the cast brass part that the adjustment knobs are located on. These are the parts with the barn paint. What would be the correct finish for these parts? I assume a matt black paint. Would "guncoat" be a OK product to use? I now see the correct marking for the range numbers and the indicator V. that should be very doable during a repaint.
After reading your two part article "Phoenix Rising from the Ashes" I feel confidant about disassembling the scope.
I don't necessarily want this to look new or rebuilt. I would prefer to keep it as original finish as possible. You can see from this photo how the paint came off the turrets.
Last edited by madcratebuilder; 01-17-2010 at 11:51 AM.
-
-
I'm not into originality Cratebuster but it looks as though some of the old brassware was just left to darken naturally. Others have been chemically blacked Maybe a chemical brass black could be used.
There is a hard, hot applied wax stuff we use to highlight the drum markings but reasonably, an kiddies playground wax crayon could be used.
When they came through our workshops, any notion of originality was forgotten about and they went through 'the works'. This 'works' didn't feature blueing or polishing brass etc etc. They just followed the rifle format!
-
The Following 2 Members Say Thank You to Peter Laidler For This Useful Post:
-
FREE MEMBER
NO Posting or PM's Allowed
Thank you peter. I have used the brass blackening many times with the cap and ball revolvers I work with.
I think I well remove the paint I have now and see what's under it. Thanks again.
-
Thanks for the photo Rob.
ATB
P.S. Mea Culpa. I forgot your little parcel -- will attend to!
-
Thank You to Roger Payne For This Useful Post:
-
Legacy Member

-
Thank You to MJ1 For This Useful Post:
-
FREE MEMBER
NO Posting or PM's Allowed
Thanks for the pics MJ1. I know what a new or refurbished scope looks like. Trying to find untouched originals is a little harder.
-
Legacy Member
I have one in better original condition but I can't find it. It's not lost I just put it some place in an anal moment.

-
-

Originally Posted by
madcratebuilder

After reading your two part article "Phoenix Rising from the Ashes" I feel confidant about disassembling the scope.
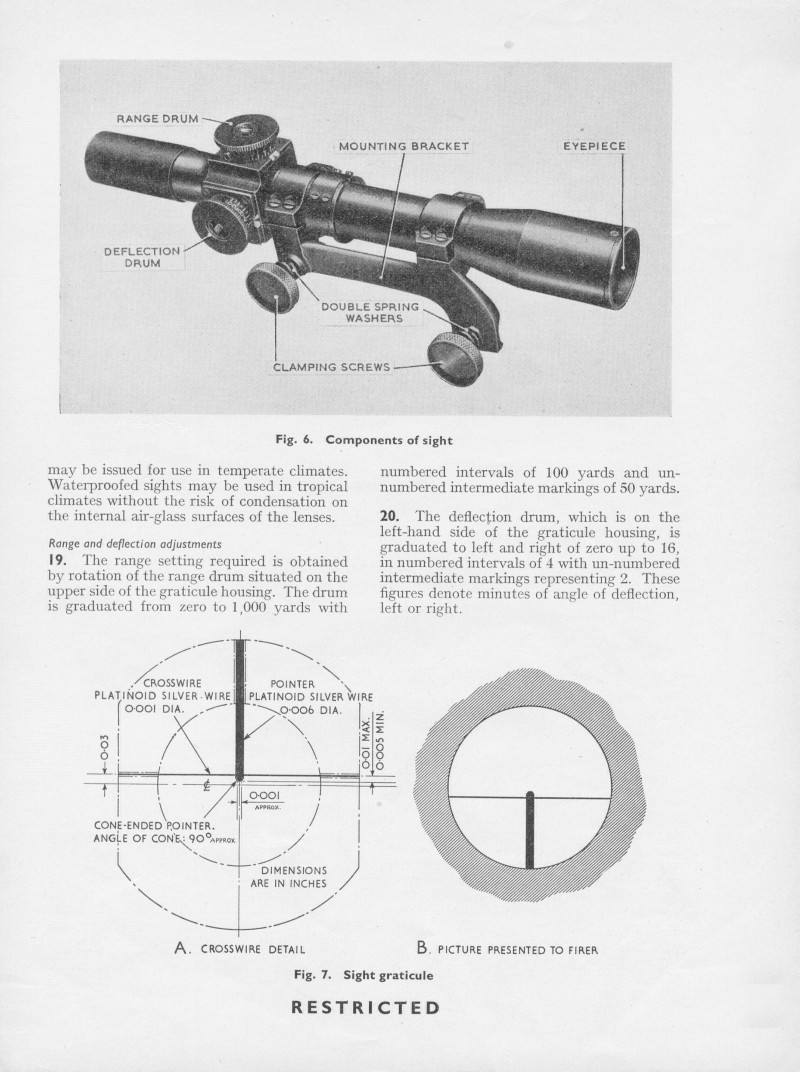
There's an entry in the England Section (click here) of the MKL (Milsurp Knowledge Library), showing the dimensions of the No.32 scope, including the measurements of the cross wires etc. So, if you start rebuilding, besides Peter's excellent two part article series, this may help as well.
 (Click PIC to Enlarge)
1952 Instructional Pamphlet for No.4 Mk1(T) sniper rifle (click here)
Note: After you click on images to ENLARGE them, you may find they automatically size smaller in your browser's window making them harder to view. The auto sizing is your browser's way of keeping images entirely within the screen size you have set. Move your mouse pointer to the bottom centre of the pic and you will see an options panel appear. There will be a small square box next to the large X, which will have a pointer arrow sticking out of it. If it's illuminated, it means the pic you're viewing can be enlarged, so click on this box and the pic will EXPAND and open to its normal size.
Regards,
Badger
-
Thank You to Badger For This Useful Post:
-
FREE MEMBER
NO Posting or PM's Allowed
I'm not into originality Cratebuster but it looks as though some of the old brassware was just left to darken naturally. Others have been chemically blacked Maybe a chemical brass black could be used.
There is a hard, hot applied wax stuff we use to highlight the drum markings but reasonably, an kiddies playground wax crayon could be used.
When they came through our workshops, any notion of originality was forgotten about and they went through 'the works'. This 'works' didn't feature blueing or polishing brass etc etc. They just followed the rifle format!
This 'works' didn't feature blueing or polishing brass etc etc. They just followed the rifle format!"
Peter , From that could I assume that a coat of sunkorite (sp) found it's way onto the exterior surfaces excepting the range dials ???


 PM
PM