-
Your sight problem is clear to me but to be honest, it'd take pages and pages to tell you what to do to fix it.................
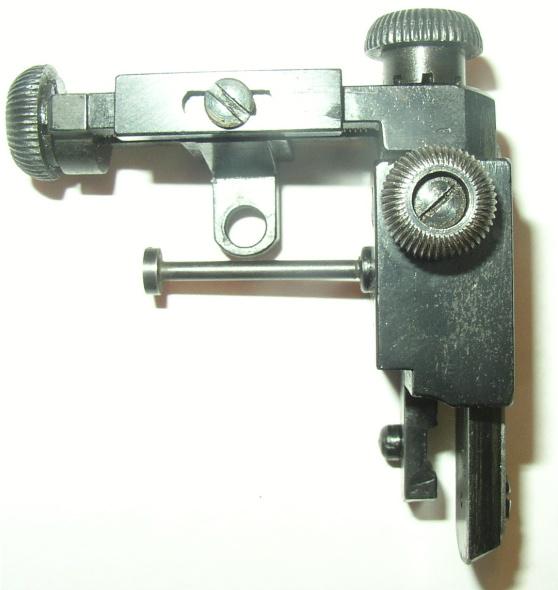
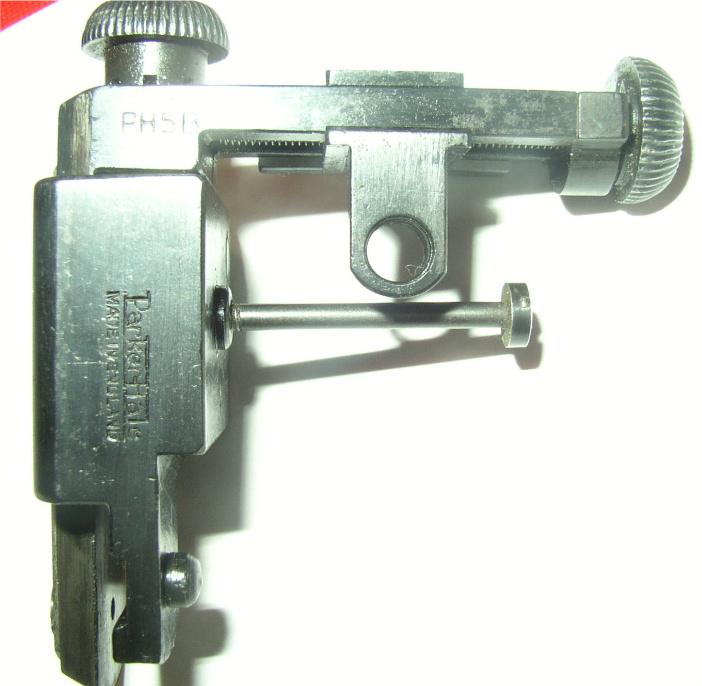
But for a start the locking nut has worked loose and you've lost your balls..........., if you'll excuse the phrase. In other words, you've got nuts and balls problems! I'd take up someones offfer and send it to them. I've got some new balls if they need any
-
-
04-24-2011 05:11 AM
# ADS
Friends and Sponsors

-
Legacy Member

PM sent on repair. Your sight is repairable. The Elevation has been dismantled. The clicker Bearing pocket is worn at the throat of the pocket and most likely gone oversized. Sight will have to be taken apart, hole repaired and new bearing/spring installed.Rest of parts look Ok however its a well used sight exhibited by the burring and lack of finish. As stated by Peter and myself, all these sights are hand fitted. I've done more than my fair share and found each and everyone a little different. hope this helps, Ron
-
-
-
Advisory Panel


Good news - you just need one ball!
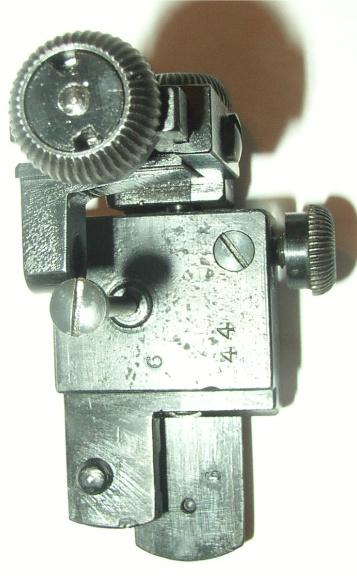
Calfed, I am looking at one of these beasts right now! No. 58 to be precise, and I think I can read 44 on your example. They certainly look identical enough for practical purposes!
In your last post I can see the detent spring in the hole on the arm, just below the upside-down PH5B.
I think you are ONLY missing the ball bearing.
I am NOT going to dismantle my sight to check the ball diameter, but it must be somewhere around 1/16". A model engineering suppliers is probably your best bet to find such an item. You will probably have to buy a small packet, but that is OK - you may lose one or two in practice!
The method is: Dismantle the threaded assembly by holding the knurled knob in one hand and unscrewing the lock nut. Circlip pliers are useful for this job.
Now unscrew the knurled knob and clean everything. Learn from my mistakes! Do not get over-enthusiastic and try to remove the spring to clean it. I did that, dropped it on a carpet, and had to have couple of pills for my blood pressure and consciously calm myself down before getting face down on the carpet to find the d--d thing. Chances of finding a replacement are approx. 5/8 of F.A. to use a British
 engineering term.
If you are not blessed with 3 hands, grip the threaded spindle vertically in a vice so that you can slide on the arm and the arm sits down fully over the raised ring at the top of the thread.
Put a blob of very thick grease on top of the spring in the hole. Sit the ball on the grease blob and apply it down so that it sits on the hole. Do not try to push it down, unless you have some spare balls to hand!
It will not really sit down in the hole, because of the extended spring, so if you do not have the threaded rod clamped in a vice, you MUST hold the whole caboodle upright and not tilt it.
Now run down the knurled knob until it is just about to touch the ball. This is the tricky bit. If you just carry on screwing down the knob you can bet that the first "click" will make the ball ping out of the sight arm, never to be seen again. You must restrain the sideways movement of the ball with a tiny forked tool, tweezers, or by pressing a finger on the side and hoping (my method).
Once you feel the first "click", do not release the assembly for any reason other than immediate personal danger! Carry on screwing up the knurled knob until the resistance suddenly increases as the ball bottoms on the rim of the hole or the knob touches the arm (depending on the size of the ball). Now back off a couple of clicks. Run down the locking nut, hold the knob in position so that it does not tighten any further, and use the circlip pliers to tighten the locking nut.
Simple really - if you stay calm. Your hardest job will be to find a suitable ball!
Good luck!
Patrick

Last edited by Patrick Chadwick; 04-24-2011 at 10:16 AM.
-
-
Sorry if it seems as if I'm jumping on everyone elses band waggon and offers of help but if, as it seems from the others comments, you have only lost your balls(!) I'll send you half a dozen so that you can play with and fix it yourself. But can I suggest to you, and others tempted to rebuild one or a Mk1 backsight, put both hands, the pin-punch and a small hammer into a see-through polythere shopping bag first THEN strip it. That way you'll never loose your balls - or temper - again. Do the same whan assembling it but put a dob of grease onto the ball first.
I was taught this as an apprentice back in the 60's for No4 and M1919 browning backsights and have used it ever since
If you fail to fix it, as well you may, then there's nothing lost as those kind offers still stand. But at least you've tried
-
-
Advisory Panel
But can I suggest to you, and others tempted to rebuild one or a Mk1 backsight, put both hands, the pin-punch and a small hammer into a see-through polythere shopping bag first THEN strip it.
Peter, you are so right. I worked out the bag method the hard way - after losing the first ball! The trauma was so great that I cannot remember why I ever dismantled the thing. ANd dropping the spring on a carpet did not help to keep me cool. I later managed to reassemble the sight inside a bag, but without a vice to hold the spindle it seems to require 3 hands and a Zen-like state of calm!
BTW, could you tell us all what the correct ball diameter is* - I just took what worked from half a century's accumulation of ME spares!
Patrick
* to be prepared for the next time....
-
-
To save me measuring my balls again, can anyone tell Patrick the diameter!
-
-
Legacy Member
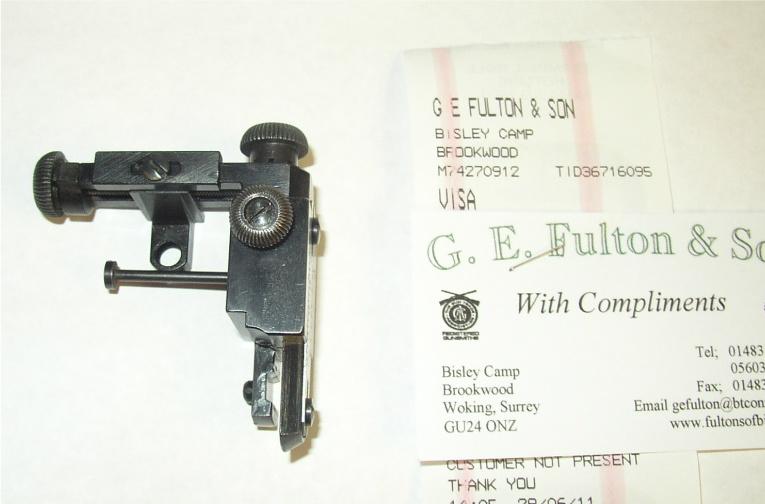
I heard back from Fulton's of Bisley in the UK. They offered to overhaul the sight for a reasonable price and I mailed it to them today.
I'll report back on my experience when they return the sight.
-
Thank You to Calfed For This Useful Post:
-
FREE MEMBER
NO Posting or PM's Allowed
Great Calfed, it's very interesting to learn the Fulton's are in the sight business, I kind of thought they'd stepped back from a lot of shooting stuff, so good to know.
The balls caliper up at .095,
Last edited by RJW NZ; 04-30-2011 at 01:15 AM.
-
Advisory Panel
Looks like the detent spring is still in the hole, but the ball is missing. Remove the windage arm and using a full set of drill bits as gauges, insert the shanks into the hole until you find one that fits precisely. This will give you the correct size of ball bearing. A bearing supply house might be able to help if they have some junked bearings around. Might be easier if you use an old dental pick to pull the spring out of the hole first. You need as exact a fit as you can get between the ball and the hole as any slop or play will all the arm to move with obvious consequences.
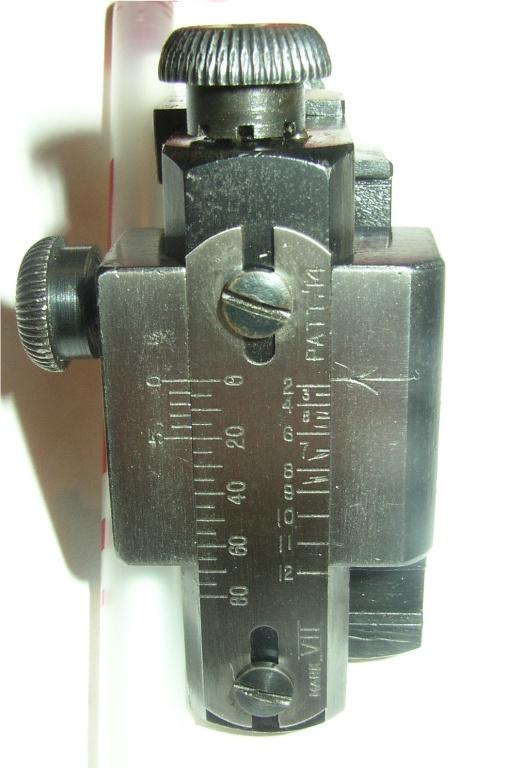
Get a suitable pair of split ring pliers and a pair of small Vise-Grips and a piece of say 3/16 - 1/4 thick leather about 1.5" x .5". Adjust the Vise-Grips to close tightly over the knurled part of the adjustment knob with the leather around the knob to protect from damage by the jaws of the Vise-Grips. With the split ring pliers, undo the locking ring in the center of the knob. Push the elevation screw up through the windage arm so that the shoulder on the rod that is visible in your photo is seated tightly against the bottom of its hole in the windage arm.
Put a bit of grease in the hole and on the ball to hold it from rolling away. Insert the ball bearing. Screw the knurled knob as far onto the elevation screw as you can without dislodging the ball bearing from the hole. Now push the knurled knob down tight against the ball bearing and the windage arm so that ball cannot escape. Maintaining downward pressure to stop the ball escaping, continue to tighten the knurled knob onto the elevation screw as far as you can
At this point it - or to begin with - it would be easiest to grip the elevation screw in a small vise with aluminum or copper jaws - NOT any other kind, although if you have the dexterity of an octopus you might be able to protect the screw with another piece of thick leather, but probably that won't grip the screw securely enough even in a vise.
When the knob is as tight as you can make it by hand on the elevation screw, give it a slight tighten with the Vise-Grips (this is where you'll need to be gripping the elevation screw somehow to stop it turning). Now start the locking ring onto the elevation screw by hand and holding the Vise-Grips, tighten against the knurled knob with the split ring pliers.
Obviously at some point the locking ring worked loose, so tighten as much as your judgement suggests or use some Loctite to secure it.
Last edited by Surpmil; 05-08-2011 at 03:24 PM.
“There are invisible rulers who control the destinies of millions. It is not generally realized to what extent the words and actions of our most influential public men are dictated by shrewd persons operating behind the scenes.”
Edward Bernays, 1928
Much changes, much remains the same. 
-
Thank You to Surpmil For This Useful Post:
-
Legacy Member
-


 PM
PM