-
Legacy Member

The TOOL, bolt head, rifle as shown by Son will work where it's a very small amount of underturn but not if it's a lot (all apprentices of the era made them.....). We never had a problem because we always had a tray full of bolts/bolt heads to fit/try before finally adjusting up and numbering. But I would turn a gnats knacker off the bolt head shoulder in this case so that you get the MINIMUM of overturn. Bolt head is really tough material and can take it
Peter,
Thank you. My "bolt head tray" is probably quite sparse (only 7 bolt heads) compared to the ones that were available in the workshops I'll contact the local machine shops and see if they'll take on this job if skimming the bolt head shoulder. BTW.....the rifle bolt fitting articles you wrote are a great reference
Thanks again!
GC
-
-
02-18-2014 08:08 AM
# ADS
Friends and Sponsors

-
Legacy Member
And in related matters:
NEVER remove material from the front face or the rear of the threaded tenon of a bolt head.
Not only does that overall dimension "set" striker protrusion, but if you remove the VERY thin hardened surface layer, you may get other problems.
There are two types of material used in SMLE bolt heads: malleable cast iron and, "mild steel". If your bolthead bears a little "M", it is made from "special" mild steel and has been hardened by carburizing the surface skin. Thus, this important pressure bearing component has a "hard" skin and a relatively soft core that SHOULD never shatter in the event of a catastrophic "Ka-BOOM". The right side rail of the receiver (body) may stretch a little and distort, the bolt will probably skew sideways towards this distortion, but the firer will be "shaken" but not requiring urgent medical assistance.
Could it be that the "dust-cover" on early Lee Enfields was also there to deflect errant gases and particles in the event of a failure of the early brass cases?
"Plain" bolt heads are made from malleable cast iron, (which is nothing like the "cast iron" used for the iron lace-work on old houses), a "low-ish" carbon, iron alloy (NO fancy stuff like chromium, manganese, vanadium, etc allowed), that can withstand the sudden shock of cartridge ignition and wear from all that "action".
-
-

Originally Posted by
Bruce_in_Oz

NEVER remove material from the front face or the rear of the threaded tenon of a bolt head.
The very rear of the bolt head , no. The front face? Perfectly normal for SMLEs. Have done quite a few. Having a barrel full of SMLEs missing all sorts of parts that I swapped perfectly good M60 parts to obtain. Was something over 50, but lost track.
Not No.4s, though. No cutting.
In my piles of SMLE bolt heads there have been some so long that they would not fit the most clapped out action imaginable. Since these heads had no small bits installed, nor any signs of use, I reckon they were NOS spares.
-
-
Legacy Member
[
Agreed. I've removed material from the bolt face on occasion, I thought it was common practice.
QUOTE=jmoore;289838]The very rear of the bolt head , no. The front face? Perfectly normal for SMLEs. Have done quite a few. Having a barrel full of SMLEs missing all sorts of parts that I swapped perfectly good M60 parts to obtain. Was something over 50, but lost track.
Not No.4s, though. No cutting.
In my piles of SMLE bolt heads there have been some so long that they would not fit the most clapped out action imaginable. Since these heads had no small bits installed, nor any signs of use, I reckon they were NOS spares.[/QUOTE]
-
-
Legacy Member
Originally Posted by
jmoore
The very rear of the bolt head , no. The front face? Perfectly normal for SMLEs. Have done quite a few. Having a barrel full of SMLEs missing all sorts of parts that I swapped perfectly good M60 parts to obtain. Was something over 50, but lost track.
Not No.4s, though. No cutting.
In my piles of SMLE bolt heads there have been some so long that they would not fit the most clapped out action imaginable. Since these heads had no small bits installed, nor any signs of use, I reckon they were NOS spares.
Hmmm ......just scheduled the bolt head shoulders skim cut job with the machine shop today......BUT...... If the shoulder at the rear of the bolt head (where the thread on the tenon ends and which surface contacts the "face"of the bolt body when the bolt head is screwed in all the way) is not to be adjusted (skim cut or whatever method is chosen) how is the under turn to be resolved? It appears to be a given that the bolt head face (striker end side) can be adjusted to address CHS. And it seems that the bolt head tenon length can be adjusted to address striker protrusion while maintaining cocking piece lift dims. Is there another way to correct the under turn besides sifting through a bin of bolt heads? Does the radial location of the start thread on the tenon play any part in this problem (brainstorming or rambling...take your pick  since the goal is to have the bolt head align with the recoil lug when it is fully screwed in?
Thanks!
GC
Last edited by gc1054; 02-19-2014 at 01:46 AM.
-
-
Your pick. It's either the bolt head or the body. Having never started with a new bolt, I've always cut the head. Doesn't usually take more than 0.002-0.003" to do the job, which ought not break through any but the thinnest surface treatment, if any. Since I've always used carbide tooling, I couldn't see any difference, it's all been fairly "crumbly", chip-wise. As far as wringing a potential "cast iron" bolt head to fit, that gives me the heebie-jeebies. It's crap in tension.
Given that there's about twice the load bearing area on this junction over the No.4 (due to an insane ID chamfer!) you'll be quite unlikely to have dramas either way you cut.
-
The Following 2 Members Say Thank You to jmoore For This Useful Post:
-
Legacy Member
jmoore,
Thanks! I'm off to the machine shop with a sacrificial/scrappable bolt head for use in machine setup and the bolt head that I plan to use. I'll post the result of this work just to wrap this thread up
GC
-
-
I want to come in here but need to understand BinOz's comment about the extreme rear end of the bolt head. Bruce, do you mean the end of the tenon or the end of the bolt HEAD part..... The part that abuts up against the diameter of the bolt?
If you mean the HEAD part, I would venture to suggest that it is acceptable to skim the rear of the HEAD part to obtain exact neutral over/underturn simply because of the structural toughness of that material. In addition and using this method/reason you can ensure that on firing, the full load of discharge is taken down the bolt head of coursew, radially onto the full diameter of the bolt and down into the locking shoulders. This exactly how it should be if all things were equal and we didn't have minor dimensional this that and the others.
After all, the method of obtaining CHS was by careful stoning of the bolt head face. I agree that it's not the rear of the head part, but while the face of the bolt absorbs the load, the rear face simply imparts the load. In milliseconds of course but.....
If the B/H underturn is marginal, which it is, then the amount of metal removed can be worked out mathematically TPI divide by 360 per degree.
Me thinking out aloud. But similar meat, different gravy, we have always stoned/adjusted the rear of the tenon to correct LIFT and FPP. That is common practice
-
The Following 3 Members Say Thank You to Peter Laidler For This Useful Post:
-
Legacy Member
I just err on the "cautious" side when fooling around with these things.
If you correct (increase) striker protrusion by shortening the tail of the tenon, you alter, very slightly, the "arrangement" with the locking bolt, cocking piece and so forth. OK, it's just a few thou', but it happens.
As for the front face of the bolt head: A couple of thou off there to increase to correct headspace is OK, as long as you remenber to check that the striker protrusion is still within limits. The striker hole hole IS TAPERED, in two "stages"; the very front part being a VERY slight taper, so a "bit off the front" of the bolt head is probably not going to make a huge difference to the diameter of the striker hole.
Note that SMLE boltheads marked "M" are made from mild steel that has been surface-hardened by one of several arcane processes.
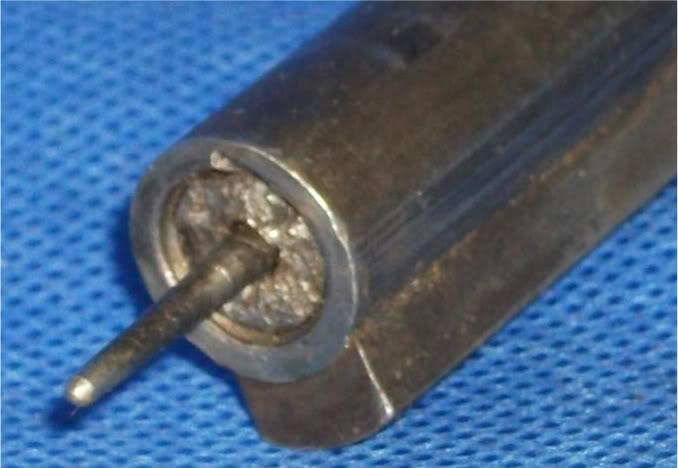
UNMARKED bolt heads are made from "malleable cast iron", a different material and one that is apparently a LOT more prone to "over-hardening" than the "mild steel". It is also much more more prone to age related crystal growth.
Particularly with the older metals, a combination of poor heat-treatment (over-cooking) and the passage of time itself, will lead to the granular-looking fractures as seen in the picture from jmoore.
Poor heat-treament alone will cause even WW2 vintage No4 cocking pieces to simply snap, usually close to the half-cock notch, showing quite large crystals in the fracture zone.
The cute thing with these actions is that, because of the helical locking, and the bolt head being threaded on, there is some tricky stuff going on as the bolt is travelling that last little bit. The helix on the locking shoulders is 1 turn in 0.10". The pitch of that weird 79 degree (and some odd minutes) bolt head thread is 20 TPI or 0.050". Thus, as the bolt handle is turning down, the entire assembly is moving forward. At the same time, the bolt head is being wound INTO the bolt body that "last little bit" and is thus moving BACKWARDS relative to the forward-moving bolt body.
It all works wonderfully and is a HUGE improvement on earlier "schemes" whereby the bolthead was attached by a collar, pin, screw or somesuch.
-
The Following 4 Members Say Thank You to Bruce_in_Oz For This Useful Post:
-
Legacy Member
Originally Posted by
Bruce_in_Oz
I just err on the "cautious" side when fooling around with these things.
If you correct (increase) striker protrusion by shortening the tail of the tenon, you alter, very slightly, the "arrangement" with the locking bolt, cocking piece and so forth. OK, it's just a few thou', but it happens.
As for the front face of the bolt head: A couple of thou off there to increase to correct headspace is OK, as long as you remenber to check that the striker protrusion is still within limits. The striker hole hole IS TAPERED, in two "stages"; the very front part being a VERY slight taper, so a "bit off the front" of the bolt head is probably not going to make a huge difference to the diameter of the striker hole.
Note that SMLE boltheads marked "M" are made from mild steel that has been surface-hardened by one of several arcane processes.
UNMARKED bolt heads are made from "malleable cast iron", a different material and one that is apparently a LOT more prone to "over-hardening" than the "mild steel". It is also much more more prone to age related crystal growth.
Particularly with the older metals, a combination of poor heat-treatment (over-cooking) and the passage of time itself, will lead to the granular-looking fractures as seen in the picture from jmoore.
Poor heat-treament alone will cause even WW2 vintage No4 cocking pieces to simply snap, usually close to the half-cock notch, showing quite large crystals in the fracture zone.
The cute thing with these actions is that, because of the helical locking, and the bolt head being threaded on, there is some tricky stuff going on as the bolt is travelling that last little bit. The helix on the locking shoulders is 1 turn in 0.10". The pitch of that weird 79 degree (and some odd minutes) bolt head thread is 20 TPI or 0.050". Thus, as the bolt handle is turning down, the entire assembly is moving forward. At the same time, the bolt head is being wound INTO the bolt body that "last little bit" and is thus moving BACKWARDS relative to the forward-moving bolt body.
It all works wonderfully and is a HUGE improvement on earlier "schemes" whereby the bolthead was attached by a collar, pin, screw or somesuch.
Thanks Bruce
In an earlier post Son had posted a picture of a "bolt head spanner" and Peter commented that most Armourers had one. Since all my bolt heads can be installed & tightened by hand I was wondering when you would need this "bolt head spanner" when working on a bolt assembly? The lever arms looks pretty long for addressing a small amount of under turn......or did some bolt heads require more force & leverage?
Thanks!
GC
Last edited by gc1054; 02-20-2014 at 10:20 PM.
-


 PM
PM


