-
Legacy Member

How to age bare metal
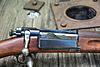
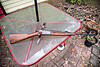
I have an 1899 Krag Carbine that I'm restoring. I am through with it, but for one thing. Previously, it had an ugly bluing job applied to the receiver, which was left in-the-white at the factory. Although the bluing didn't look all that bad, it wasn't the original finish, and that's what I'm after. I have chemically removed the bluing (no polishing at all) and it looks much better. However, I'm now left with metal that has no patina, or age on it. My other Krag receivers are more of a grey-color. I know there is no way to replicate the aged look exactly, I've heard that vinegar and salt can be used to achieve an aged-look, but I don't want to try it on a valuable firearm without getting some more info on this approach. Have any of you done this? Or, is a method other than the vinegar and salt method better? Here is a before and after close-up of the receiver, and an overall pic of the rifle after my restoration. Thanks for any help you might give.
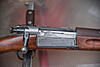
Information
 |
Warning: This is a relatively older thread
This discussion is older than 360 days. Some information contained in it may no longer be current. |
|
-
-
05-14-2023 09:20 PM
# ADS
Friends and Sponsors

-
Legacy Member

Lots of use and sweaty hands should solve the problem.
-
Thank You to Daan Kemp For This Useful Post:
-
-
Contributing Member


Originally Posted by
daveboy

which was left in-the-white at the factory
???
A slow rust blue finish. Only the bolt body was left in the white. If you are going all out "original", the butt plate, extractor, and magazine cutoff are case hardened, and perhaps the underside of the magazine cutoff in the white depending on the year. I'll need to pull my references off the shelf to double check. I have a NOS bolt assembly on one of my krags. The extractor is a beautiful peacock blue. This is accomplished by tempering at the right temperature. Simplest way to achieve this (same for the magazine cutoff) is to temper it in molten lead. Anyone who already casts bullets can do this.
For old rifles that I'm not "restoring", I like to go for a functional finish that doesn't appear brand new, but looks cafefully maintained over the years of service life. For this, I degrease very well, and then just one or two applications of slow-rust blue and boiling. I like Mark Lee's Number 1. It's quick, very easy to work with, and easily produces uniform results. You can do the same to bare metal that hasn't been sanded or anything, and it won't look too new when you're done. I've refinished a few krags before, and you will notice on parts like the loading gate and side plate there are faint "swirls" in the metal that are part of the original metallurgy. If you don't polish these out, you will just barely see them in the first iteration or two of your slow rust blue, and it will be perfect.
If rust bluing over the original bluing, it will be more difficult to degrease. For this, I start by boiling directly for 45-60 minutes. This converts any surface rust, and lifts out all the oil and grease. Then card with 0000 steel wool. This will show you what you truly have to start with. You may be surprised and choose to stop here. If you need to bring up the finish a bit, then finish degreasing with dawn dish soap and 0000 steel wool (much easier now that you already boiled once), and do one or two rust blue applications or until you're satisfied.
I assume your middle picture is before? and the 1st/3rd are after you stripped off the original finish? If so I think you'll be pleased with the results of a couple, very light applications. You can really control the outcome very well with Mark Lee's #1, much more so than other solutions. Heavy initial coats will produce deeper/darker results in the end. The final lighter coats just evens it out. So use light applications if you want a slightly worn, "vintage" look.
It's easier than you think to do. I highly recommend boiling over steam. I've never had good results, ever, with steam. Maybe it's just me, but I've tried so many times. Boiling is just simpler and easier. I use a hot water heater element in a section of 4" pvc drain pipe, or sometimes a section of aluminum gutter over a hot plate. I've noticed Mark Lee's #1 will convert with water as low as 180F.
-
The Following 2 Members Say Thank You to ssgross For This Useful Post:
-
Advisory Panel

Originally Posted by
ssgross
Only the bolt body was left in the white.
That was what I thought.
-
-
Legacy Member

Wow, a little research goes a long way BEFORE starting any project.
Everyone above is right. Case hardened is the correct finish for the magazine loading gate, cutoff switch, receiver cover and receiver. The extractor is also supposed to be a distinctive fire blue and not white. Only the bolt itself was originally a polished white. What a shame.
-
-
Contributing Member
Great job on the wood! It looks used but cared for.
-
-
Legacy Member
-
-
Legacy Member
I think it looked better before!
-
-
Legacy Member
The "before picture" shows an aftermarket Buehler safety-lever. Was this action drilled & tapped for a scope at one time?
Last edited by butlersrangers; 05-17-2023 at 11:48 AM.
-
-
Legacy Member
Originally Posted by
oldfoneguy
Wow, a little research goes a long way BEFORE starting any project.
Well, like I said, the receiver had some cheap, improperly applied bluing applied to it when I got it. So, stripping that off did not cause any harm as I can tell. Case hardened metal, of that age, usually has a dark grey finish. That is what I am trying to replicate. Only the bolt body has been polished in any way. The extractor still has the fire blue.
---------- Post added at 07:22 PM ---------- Previous post was at 07:19 PM ----------
Originally Posted by
Jakeroub
I think it looked better before!
It may have looked "better" but a glossy, cheap, modern bluing job is nothing close to original. That is why I took it off.
---------- Post added at 07:28 PM ---------- Previous post was at 07:22 PM ----------
Originally Posted by
Singer B
Great job on the wood! It looks used but cared for.
Thanks. This rifle is put-together with donor pieces from all over. This is a cut-down rifle stock.
---------- Post added at 07:32 PM ---------- Previous post was at 07:28 PM ----------
Originally Posted by
butlersrangers
The "before picture" shows an aftermarket Buehler safety-lever. Was this action drilled & tapped for a scope at one time?
Good catch! That is one of the things that I fixed on this restoration. It has not been drilled and tapped. Someone, somewhere along the line had a Buehler lever they weren't using, and it went on here. This rifle has been thru a lot of hands, each trying to "improve" it. I suppose I am too, but my improvements tend more toward the "restoring to original look."
-
Thank You to daveboy For This Useful Post:


 PM
PM


