-
Advisory Panel


Originally Posted by
Garandy

dressing down the ding a smidge
I've always just used a crown tool, usually dressed by hand from a standard tool steel blank lathe bit. Just get turnin'...
-
-
02-12-2025 09:46 PM
# ADS
Friends and Sponsors

-
Legacy Member
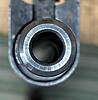
To be honest, I wasn't 100% sure the pilot of the crowning tool would fit the bore without dressing the ding down slightly since it is right at the end of a land and wanted to have a plan if it was needed.
I figured I would likely have the opposite issue since the tool I got is designed for the M1 Garand which is the pilot fit is a little loose in the bore and I was right. Pilot is about .2995" and the bore diameter is over .301" but less than .307". I can get other bushings for this tool, any consensus on how tight the pilot should fit in the barrel? I presume the less slop, the better the finished product.
Unfortunately, I don't have any pin gages between .301" and .307" so I'm going to check with a buddy who was a machinist and see if he might have something I can borrow in the range I need to get a better measurement of the ID at the muzzle.
Other available bushings for this tool over .301" are .3016", .3018", .3020", .3022", .3024", .3026", .3028", .3030", .3032", .3034", .3036", .3038", .3040", .3042", .3044".
Big thanks to Roger Payne, my screws got here in yesterdays mail. I really appreciate you sending them!
-
-
You are welcome Andy. As an aside I thought I might mention where I source my small bolts & screws. They are quick, not overly expensive, & happy to post internationally. I get all my 8 & 10 BA screws for No32's from there, as well as body pad screws for 4T's.
It's 'BA Bolts', of Cheltenham. Anyone who needs anything like this, if you put their name into your search engine you'll find their web site easily enough.
-
Thank You to Roger Payne For This Useful Post:
-
Legacy Member
Still waiting to hear back from my buddy, but it seems that my existing pilot with one wrap of Scotch tape with no overlap is about .3035" and that fits in the bore much more snugly. It will not fit with a wrap and a half so I'm likely somewhere under .3055" based on my quick and dirty measurements.
-
-
Legacy Member
Crown is done (no pic just yet).
Have not found time to play with the loose front pad just yet. Maybe next weekend.
-
The Following 2 Members Say Thank You to Garandy For This Useful Post:
-
Legacy Member
This took way longer to get back to than I wanted, but here we are.
Screws (thanks Roger) shortened and blued, cleaned, tinned as best I could, pad and body cleaned, threads on the body chased, a little flux and solder added between the pad and the body after smashing some fine diameter solder flat with a hammer until it was paper thin and then a bit of torch and screwdriver work. After than I staked the screws into the existing stake marks in the pad and touched up the finish on the screwheads where I had done the staking.
It remains to be seen if my soldering work will hold up.
-
The Following 4 Members Say Thank You to Garandy For This Useful Post:
-
Legacy Member

Originally Posted by
Garandy
This took way longer to get back to than I wanted, but here we are.
Screws (thanks Roger) shortened and blued, cleaned, tinned as best I could, pad and body cleaned, threads on the body chased, a little flux and solder added between the pad and the body after smashing some fine diameter solder flat with a hammer until it was paper thin and then a bit of torch and screwdriver work. After than I staked the screws into the existing stake marks in the pad and touched up the finish on the screwheads where I had done the staking.
It remains to be seen if my soldering work will hold up.
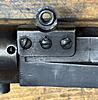
Attachment 138998Attachment 138999
I was taught that when staking you 'stake' at the end of the screwdriver slot so the deformed metal goes into the screw-slot.
I think pretty much all the 4Ts I have seen have been staked that way.
My current 4T
Mine are not the best, but they are not too bad. I can think of lots of Enfields I'd rather have but instead of constantly striving for more, sometimes it's good to be satisfied with what one has...
-
The Following 2 Members Say Thank You to Alan de Enfield For This Useful Post:
-
Legacy Member
The pads staked into the screw slots is how this was staked previously before this repair.
I don't know how long ago it was posted, and the search function does not find it now but Peter Laidler posted something that I printed out at the time (probably 15 years ago) and labeled "No 4 T Pad Fitting Part 1" that stated that he would stake the screw heads into the existing stake marks so as to not tear up the pads any further. I figured I would try that approach and could always go with the "traditional style" staking later if needed.
-
Thank You to Garandy For This Useful Post:
-
Advisory Panel
Looking forward to the range report.
-
-
Yes, Garandy, you're right. I did suggest that and it was passed along the Armourers chain during the lifetime of the L42 when loose front pads were becoming a problem. It makes engineering sense too
We always used to set the recoil on the layer during range testing to HARD to test the fastness of the graticle and the front pad on the L42's. But the same applies equally to the No4T's
We used to wish that there was a similar simple solution to the dire quality of the fore-ends........
-
Thank You to Peter Laidler For This Useful Post:


 PM
PM


