-
FREE MEMBER
NO Posting or PM's Allowed

M1 Leather Cheek Pad
I need a diagram on how to lace up the leather cheek pad on a M1 . TIA
. TIA
Jeff
Information
 |
Warning: This is a relatively older thread
This discussion is older than 360 days. Some information contained in it may no longer be current. |
|
-
03-04-2009 06:37 PM
# ADS
Friends and Sponsors

-
Contributing Member


-
-
-
FREE MEMBER
NO Posting or PM's Allowed
Thanks Mark that will do...
-
FREE MEMBER
NO Posting or PM's Allowed

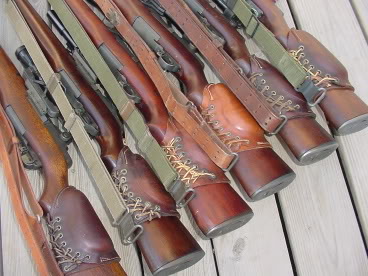
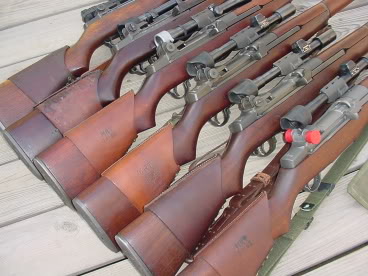
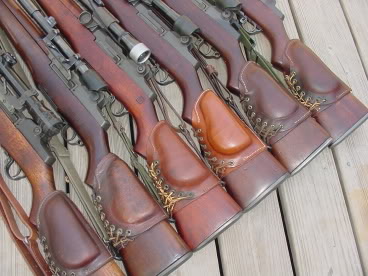
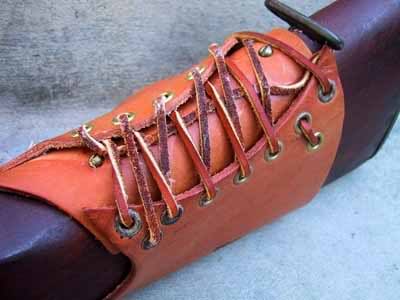
That's a nice picture but unfortunately that doesn't depict the configuration of the cheek pad or at least the ones I've seen. The attaching screws attach a different piece of leather to the stock, and then the two halves of the pad lace together over the piece which is screwed to the stock. I just put a cheek piece on an M1D using TM 9-1005-222-35 Rifle, Caliber .30, M1 M1C (Sniper's) and M1D (Sniper's) dated Feb 1966. Hard to explain without pics and I don't have any. Even with pics, the lacing is difficult to figure out. Maybe you can find this TM on-line.
-
FREE MEMBER
NO Posting or PM's Allowed

I need a diagram on how to lace up the leather cheek pad on a M1. TIA
Jeff
Check out Eric Nicolaus website. He has a lot of good stuff and lacing the cheek pad is there along with a host of other stuff. If you can get ahold of TM9-1005-222-12 dated 17 March 1969 you will see a step by step process of installing and lacing the pad. I have seen three different manuals showing three different ways it's laced. Eary manuals are different from the late manuals. There are at least three different types of check pads and laced different. One is shown below.
Pad lacing file: http://www.nicolausassociates.com/PD...d.Mounting.pdf
Eric Nicolaus website: Free Stuff - For Your M1 Garand, M1 Carbine, M14, M1911, M1917, and M1903

-
Legacy Member

-
The Following 2 Members Say Thank You to FlightRN For This Useful Post:
-
FREE MEMBER
NO Posting or PM's Allowed
Thanks guys you have been very helpful.
Jeff
-
FREE MEMBER
NO Posting or PM's Allowed

Originally Posted by
rongee

I just put a cheek piece on an M1D using TM 9-1005-222-35 Rifle, Caliber .30,
M1 M1C (Sniper's) and M1D (Sniper's) dated Feb 1966.
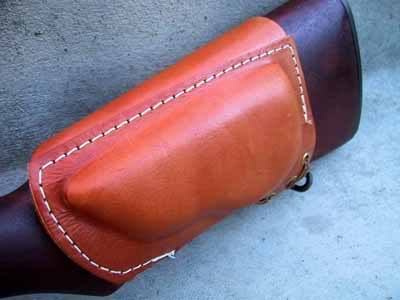
I decided to post pics of how I mounted and laced my cheek pad. Michael is right. There are a couple of ways of lacing up these pads. I believe that the late stocks from the Tooele Arsenal rebuilds are thicker than your earlier GI stocks. This makes the lace up not as neat as some of these pics depict. My installation is correct according to the TM. The lacing may not be, but it was as neat as I could make it.
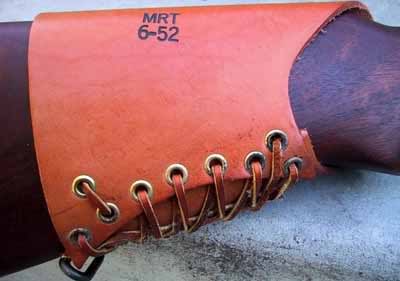
Last edited by rongee; 03-05-2009 at 07:56 PM.
-
FREE MEMBER
NO Posting or PM's Allowed

Varation: Laced front to back
I like this way better. Front to back -- a bit more tight and tidy looking
-
FREE MEMBER
NO Posting or PM's Allowed

Fitting Leather to a Stock
Originally Posted by
rongee
This makes the lace up not as neat as some of these pics depict. My installation is correct according to the TM. The lacing may not be, but it was as neat as I could make it.
Thanks for these posts. Very informative. Having made up a couple of leather stock covers for other guns, I've learned a little that might be helpful. The reason Rongee's leather looks as it does (Thread #8) is that it has shrunk over the years or was made a tad too small. This is not hard to fix. Soak the leather (but not the section with the grommets!) in a solution of warm water, with 20% rubbing alcohol and a little glycerin. Once the leather has absorbed the mixture (no more than 10 minutes) it can be stretched. Place a piece of plastic kitchen wrap around the butt stock to protect the finish. Lace up through the grommets (see thread #9), leaving the laces very loose so that the leather cover will slip over the stock, then pull it tight together holding the area of the grommets -- stretching the leather, bringing it within a 1/2 inch or so of meeting. Then, gradually tighten up on the laces, stretching a little more each time until the edges meet. The leather will conform to the irregularities of the stock. Let it sit overnight to dry (don't force the drying time!).
When dry, then apply a 50/50 mixture of beeswax and neatsfoot oil (melt together in a double boiler) to soften the leather and keep it preserved. (light tan Kiwi shoe polish will do if you don't have the right ingredients) Then remove the leather, remove the plastic wrap, and remount the leather.
Good luck.
Last edited by Seaspriter; 10-17-2015 at 10:39 PM.


 Register To Reply