


This is a restored text taken from an old thread, prompted by a recent private query, but valid for restoring any rifle with a wooden stock. The original had lost all the photos!
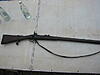
The rifle which led me to assemble this photo-story is an original P53 (photo as bought, it looks better now).
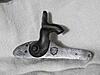
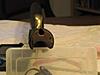
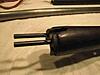
And this is its lock
No, NOT a Khyber Pass Special, but an "genuine copy" of a P53 (a.k.a. 3-band Enfield) made in the Kabul Arsenal.
??? How come ???
The ruler of Afghanistan from 1868-1876 was Sher Ali Khan. And an arsenal was set up in Kabul to manufacture copies of Enfield Rifles. The lock pictured above was not made by Enfield, but it is of respectable quality, the parts being marked as a set with small dots in the typical 19th century fashion for small batch production.
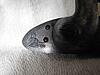
The mark towards the front of the lockplate

is the emblem of Sher Ali Khan. Sher (or Shere) can apparently mean lion (in Afghanistan) or tiger (in India/Pakistan) depending on which animal is of local significance. In either case, the emblem is a symbol of power, and in the Persian/Afghan area it is definitely a lion - not "Hallo Kitty", as was suggested on another forum! So, recalling The Jungle Book, I have named it "Sher Khan".
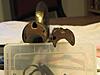
The Tughra at the rear of the lockplate
says, in a decorative way, "Kabl Karkhana(h) 1291". Quite clear, if you spend a happy hour untangling it!
Translating the words and the Islamic date: Kabul Arsenal 1874.
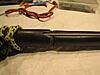
Unfortunately, a previous purchaser of this rifle had subjected it to a "duffle cut",
which brings us back to the subject of this thread:
How to repair a duffle cut (Part 1)
The very first things you need are a couple of 1/4" dowel centers. Smaller will be too weak in the dowels. Larger will leave weak walls in the stock after drilling the holes for the dowels. 3/16" would also be OK with metal dowels, but 5/16" would be far too large.

Buy them, make them, but do not attempt the job without them! For success, it is absolutely vital that the dowel holes in both parts of the stock are perfectly aligned. For that, you must have the dowel centers - and a means of aligning the two halves of the stock!
Here is the ominous cut.
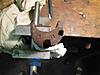
And in this case, the hole and slot for the ramrod provide an excellent channel for alignment by using a piece of threaded rod (doesn't have to be threaded - it just happened to fit).
The other option is to use the barrel channel itself. In fact, using the ramrod channel and the barrel channel will give you the best possible alignment!
Step 1) Mark the fore-end for the dowels. I chose the fore-end as a starting point, because it is easier to handle than the back end.
As you can see, I changed my mind about the location of the 2nd hole, because of the weakened cross-section resulting from the cutout for the band-spring.
Step 2) Mount the fore-end so that the holes will be parallel to the barrel channel. Take great care over this - you only get one try, so it had better be right!
I am fortunate in having an old Boxford (= Southbend) lathe that has a vertical milling slide that is large enough to clamp the stock. It is a tricky business to get the wood clamped without marring it!
Step 3) Drill the holes. The holes must be wide enough to take the dowel material that you are going to use, plus about 1/64" oversize, so that the excess glue can be squeezed out when the dowels are pushed in. This also provides a bit of "wiggle room" for alignment. Start with a center-drill, as this provides a cleaner hole than a normal twist drill, which will tend to splinter the edges of the hole.
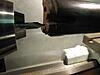
Continue with a standard twist drill to a depth equal to the intended insertion length of the dowel, plus about 3/8 to allow for glue piling up at the bottom of the hole!
(End of Part 1)Information

Warning: This is a relatively older thread
This discussion is older than 360 days. Some information contained in it may no longer be current.
- Knowledge Library

- MKL Entry of the Month
- Australia
- Austro-Hungarian Empire
- Canada
- Czechoslovakia
- Denmark
- Finland
- France/Belgium
- Germany
- Italy
- Japan
- Norway
- Russia
- South America
- Sweden
- Switzerland
- Turkey
- United Kingdom
- United States
- Yugoslavia
- Is my rifle authentic or a fake?
- Jay Currah's Lee Enfield Web Site
- On-line Service Records (Canada)
- Technical Articles/Research
- Forum
- Classifieds
- What's New?
-
Photo Gallery
- Photo Gallery Options
- Photo Gallery Home
- Search Photo Gallery List
-
Photo Gallery Search
- Video Club
- iTrader

 PM
PM