-
FREE MEMBER
NO Posting or PM's Allowed

No.4 trigger stoning..and other question
This evening i disassemlbed sear and trigger. Not so simple thing to do because 1) i hit my index finger using hammer 2) i lost sear axis. beacuse i hit it too hard , using hammer. So what nail could i use in order to re build sear axis?
And second question: how can i obtain a crisp, two stage, trigger weight of 3 pounds + 1 ounce ( that means 1,5 kg, minumum allowed for military match here)?
First, i prefer to polish sear surface s that engagé ribs and cocking bent.
Second, i would polish trigger ribs, but how sould i use to do this ona safe manner? Stone couldn't follow rib' silhouette. After that i'll re check trigger wheight.
At the end i could slide cocking bent on a 6000 grit honing stone, only a few times.
Is it possible to polish trigger and sear axis?
I'm in doubt..i'll do nothing before rading your advive.
Information
 |
Warning: This is a relatively older thread
This discussion is older than 360 days. Some information contained in it may no longer be current. |
|
-
07-31-2013 05:37 PM
# ADS
Friends and Sponsors

-
FREE MEMBER
NO Posting or PM's Allowed
sounds like you have the right idea.
polish some, assemble. then do it again till you get the trigger pull you want..
that is how i great improved the trigger pull on my t.
-
-
FREE MEMBER
NO Posting or PM's Allowed

Originally Posted by
mrbungle

sounds like you have the right idea.
polish some, assemble. then do it again till you get the trigger pull you want..
that is how i great improved the trigger pull on my t.
I'd like to do my trigger as well, some clear guidence would be good, apart from a piece on youtube I have not found much on how to do it right, or even if its advisable to do it!
-
Legacy Member

-
Thank You to gsimmons For This Useful Post:
-
Legacy Member
Captain Laidler has provided some information on this subject in the past.
Here is my five lira worth:
On the cocking piece, the ANGLE and FLATNESS of the front face are CRITICAL. If the angle is too steep, the sear will slide straight off, thus causing a VERY dangerous condition. If too shallow, the trigger operation will be safe, but ridiculously heavy. Before you start playing, test the performance of the striker spring; if it is too soft, playing with other parts is pointless.
Furthermore, of you get carried away with "stoning", you may do another nasty thing:
Cause mis-alignment of the cocking piece and safety "locking bolt".
If the cocking piece sits too far forward at full cock, the slots in the side will not line up correctly with the driving-flat on the end of the locking bolt. That's the correct name for what most folk call the "safety catch". If this happens you will either chew up the locking bolt or, if really bad, you will not be able to engage it at all.
Not sure about No4s, but on a SMLE, the dimensional allowance from axis to bent of the top arm of the sear is 1.6018" Max, 1.5988" Min, a tolerance of 0.003".
On the cocking piece, the angle of the full bent (front face) is 86 deg, 10 min. It is a dead FLAT surface.
I do not have the materials data for No4 cocking pieces, but SMLEs were a carefully heat treated CARBON steel. In fact, the heat treating was quite complex, there being three "zones"; full-bent, middle with safety stud, and the rear "button" area. Final dimensions and finish were done AFTER the correct hardnesses were achieved; LOTS of precision grinding.
Correctly assembled, the system should meet the following criteria:
1. The locking bolt (little flat on the end of the lever shaft) should freely engage the full-cock and half-cock notches on the lower left side of the cocking piece. The lever should be drawn back with the fore (trigger) finger, (thus, conveniently, keeping it off the trigger). Correct drill: "ON with the finger OFF with the thumb". If there is heavy drag, there is probably a dimensional problem with the cocking piece, sear or both. NOTE: when the "safety" is engaged, the cocking piece sits clear (to the rear) of the sear, When you rotate the locking bolt forward (off/FIRE), the cocking piece is returned to rest on the tail of the sear.
2. In the "fully-cocked" position, the trigger should have two stages. These are determined by the two "bumps" on the trigger itself. On "first' pressure, the sear should be moved SLIGHTLY down the face of the full bent of the cocking piece. This SHOULD also (all angles and dimensions being correct) move the cocking piece to the rear VERY slightly.
Now, here is the IMPORTANT bit. If you relax this first pressure, the sear spring SHOULD force the sear back UP to its resting position and the cocking piece SHOULD move forward to its previous resting position. If this return movement of the sear does NOT occur, you have a potentially dangerous situation. It also indicates that the sear spring could be weak or that one or more of the angles, dimensions, hardness and surface grade (smoothness) of the components are NOT to spec.
A lot of "range" rifles seem to have been subjected to "redesign" of the trigger function and thus have "single stage" triggers or ludicrously light set-ups. If you are firing single shots at a slow pace, you MIGHT get away with this: forget about fire and movement / "run-downs", especially if the safety assembly has also been "customised".
Check out the "Knowledge Library" for further technical data and procedures.
-
The Following 2 Members Say Thank You to Bruce_in_Oz For This Useful Post:
-
FREE MEMBER
NO Posting or PM's Allowed
Thanks you all. Cocking piece is well fitted regarding Peter articles. In order to polish trigger ribs i thought about gluing 600 grit emery cloth on a small wooden stick in a way i can follow rib form accuately. What were polishing methods used by old armorers?
-
With thanks to Advisory Panel member Peter Laidler, check his article presented in two parts in the Technical Articles for Milsurp Collectors and Re-loaders (click here).
"The Trigger Pull-Off" - Part 1 (By Peter Laidler) (click here)
"The Trigger Pull-Off" - Part 2 (By Peter Laidler) (click here)
This interesting article is accompanied by a detailed photo montage of a previously damaged skeletonised No.4(T) rifle, used as a training piece for budding Armourers to learn with and develop their skills. As Peter says "It appeared that this ‘rifle’ had never been finished as a ‘T’ as the front pad hole had not been drilled. During bead blasting after a hard life as a skeletonised rifle, it was established that the screw had sheared off and simply been made off level. Drilled out and extracted, it’s back to its former self. Waste not, want not as they say…". Other photos in the article show the clear interaction of the sear, cocking piece and trigger during various phases of its operation.
Article Extract .....
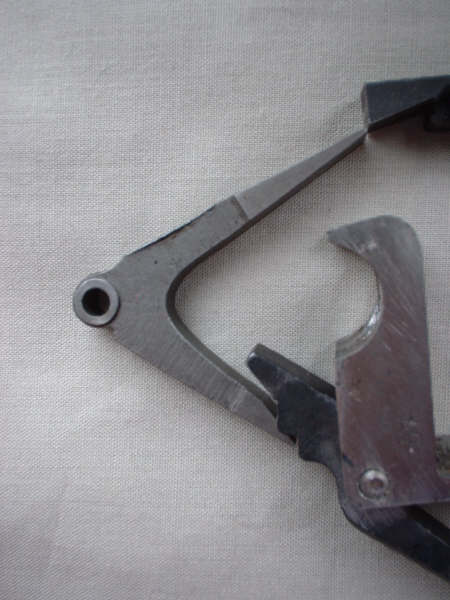
Pictorially, this shows the trigger at the end of the first pull, both ribs touching the trigger bent or flat of the sear with the sear nose at the extreme edge of the cocking piece………, just ready for the off.

(Click PIC to Enlarge)
Hope that helps … 
Regards,
Doug
-
Thank You to Badger For This Useful Post:
-
Contributing Member


I am very cautious about this sort of thing, because there is no going back once you do too much. Altering the angle of the cocking piece can be a big mistake for non-experts like me. So I just use a felt wheel in a Dremel, dipped regularly in some polishing compound, to make the surfaces mirror-smooth. Keep the moving circumference of the wheel going down the cocking piece face, not across it, so any microscopic scratches are taken out.Attachment 45019
-
The Following 2 Members Say Thank You to RobD For This Useful Post:
-
FREE MEMBER
NO Posting or PM's Allowed

Sound like you´d need a couple (or more) spare triggers for backup.
-
FREE MEMBER
NO Posting or PM's Allowed
Originally Posted by
RobD
I am very cautious about this sort of thing, because there is no going back once you do too much. Altering the angle of the cocking piece can be a big mistake for non-experts like me
I'm a non espert but like you. I used same tecnique i use for sharpening my wood chisels: lie cocking piece surface plane on a 6000 grit honing ston and every 5 " strokes" i reassembled the bolt and checked weight. this way risk of altering thar surface is minimum. Now trigger weight is 2 Kg. and i leave it and reassemble the rifle.
I have also 5 trigger of back up and 5 sears and five cocking piece.... there's room for error.


 Register To Reply